You can call it spirit level, bubble level, or simply a level. It is a tool used to indicate whether a surface is horizontal (level) or vertical (plumb). It is a versatile tool used that you need everywhere whether you’re hanging pictures, installing cabinets, or building structures, and is a must-have tool in your toolbox kit.
However, if you have never used it before, it can be difficult to know how to use a spirit level correctly.
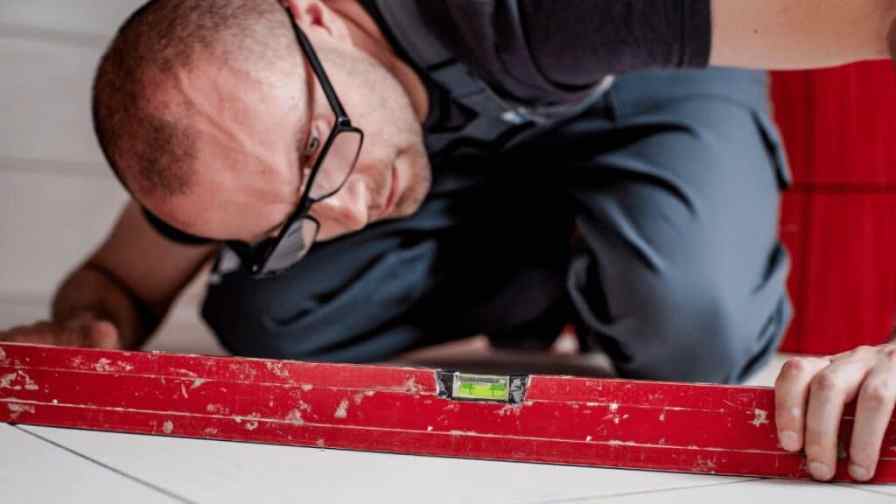
You must be wondering what the bubbles in the tube mean and what these guidelines are for and how to use a level. Using a spirit level may seem like a simple task, but there are a few key steps that need to be followed to get accurate and reliable results.
No worries, We have come up with this article to clear all your queries and everything you need to know about using a level. We will also be covering the different types of levels so that you can get a clear idea about which tool to get for yourself that suits your work. You are going to learn a lot from this article. So keep reading.
Why A Spirit Level Is Called So?
A spirit level is called so because it is usually filled with a colored spirit or alcohol. The tube in the level is incompletely filled so that it leaves a bubble inside it.
The spirit is enclosed in a small, clear vial with a curved shape, and a small bubble is allowed to move freely within the spirit. Alcohols or spirits are used instead of water because they have a very low viscosity and surface tension and have a much wider temperature range and thus won’t freeze in cold areas.
Low viscosity is preferred because this property helps the bubble to travel through the tube quickly and settle accurately. This is achievable due to the low inference of spirit or alcohol with the surface of the glass, unlike water or oil which tends to stick to the glass surface. Spirits and alcohols are usually colorless. So for easy visibility, a colorant, usually yellow or green is added to the liquid.
13 Different Types Of Spirit Level
A spirit level comes in a variety of different types and each type of spirit level is designed to meet specific needs, and the type you choose will depend on the task at hand.
Aluminum, plastic, wood, cast iron, and composite materials are among the materials used to make spirit levels. Professionals and tradespeople who use spirit levels include carpenters, masons, framers, electricians, plumbers, and woodworkers. we will explore the different types of spirit levels in more detail, including their features, advantages, and recommended applications, so you can choose the best type of spirit level for your specific needs.
1. Carpenter’s Level
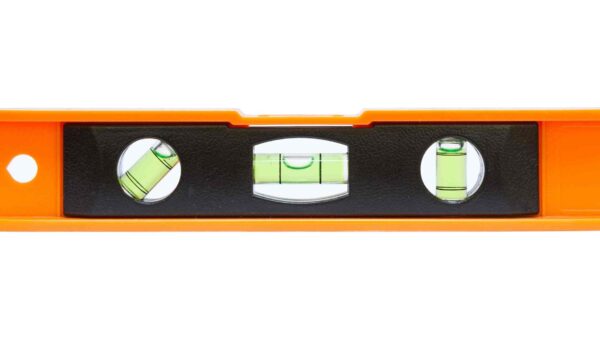
A carpenter’s spirit level is a type of spirit level that is designed specifically for use by carpenters and other woodworking professionals made up of simple and lightweight rectangular frames.
It is typically longer and narrower than a standard spirit level and has two vials that are mounted perpendicular to one another, allowing for both horizontal and vertical leveling.
They consist of two or more tubes filled with spirit and have two notches or vertical lines to indicate the Centre.
Carpenter’s spirit levels are often made of high-quality materials, such as aluminum or magnesium, to ensure durability and accuracy.
They may also feature additional features such as shock-absorbing end caps to protect against damage from falls or impacts.
Some carpenter’s spirit levels may also include measuring markings or a ruler, making it easier to take precise measurements while leveling surfaces.
They come in different sizes two feet, four feet, and eight feet models. Two feet models usually have a single tube while four feet models and eight feet models have three tubes.
The center tube is horizontally placed and used for horizontal leveling while the other two are vertical for a vertical level or plumb.
2. Mason’s Level

A mason’s level is a specialized type of spirit level that is designed for use by masons and other professionals in the construction industry.
They are used for tasks such as laying brick, block, or stone, and for ensuring that walls and other structures are plumb and level often used in combination with a plumb bob.
Mason’s levels are ones that are four feet or longer usually longer than a carpenter’s level. It is great for measuring wide and long surfaces like walls.
A mason’s tool is of good quality and a tool of legends. It is made up of specially selected hardwoods like mahogany and rosewood.
Its frame is durable and you can feel the quality and investment when you hold it. However, it is not for measuring smaller objects. So it is not good for all-purpose uses.
3. Torpedo Level
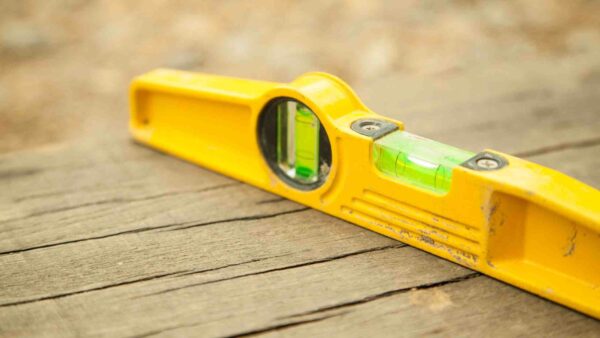
A torpedo level is also called a mini spirit level and is smaller and more compact than a standard level designed for use in tight spaces where a larger box level may be difficult to use.
A torpedo level typically measures between 6 and 12 inches in length, making it easy to carry in a pocket or tool belt. They are also called canoe or boat-shaped levels.
One of the defining features of a torpedo level is its two vials, which are set at 90-degree angles to one another.
Many torpedo levels feature additional features such as magnetic bases, which allow the level to be attached to metal surfaces, making it easy to use with one hand.
4. Pocket Level
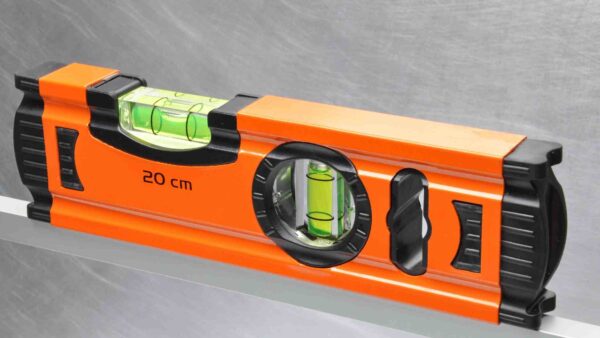
A pocket spirit level is small even smaller than a torpedo level, a compact version of a traditional spirit level that can easily fit into a pocket.
When the space is tight for a torpedo, you will be needing a pocket level. They are very suitable for a quick check.
It’s a very handy tool and you can carry it anywhere. Some models also include a clip or a keychain, making it easy to keep the level handy and within reach.
Overall, a pocket spirit level is a convenient and practical tool for anyone who needs to frequently check levels on the go.
Their compact size and portability make them an essential tool for professionals and DIY enthusiasts alike.
5. Post Level
A post level is a specialized type of spirit level designed for use when installing posts or poles that features three vials set at 90-degree angles to one another, allowing for precise leveling in all directions.
It is often used by professionals such as carpenters, fence builders, landscapers, and homeowners who are looking to ensure that their posts or poles are installed accurately and securely.
A post level is L-Shaped forming a 90-degree angle with three-level vials. One on each wing and another at the Centre.
This is a simple and easy-to-use tool that is used to erect posts or align ceilings, decks, and other fixtures by checking both levels and plumbs at a time on all sides.
6. Line Level
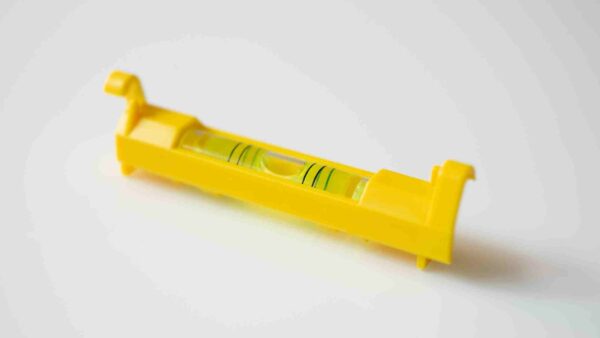
A line level is a small and compact level that is designed to be used with a string or line commonly used in a variety of DIY and professional applications.
Line levels are commonly used in tasks such as laying out foundation footings, setting fence posts, and installing suspended ceilings. Can also be used for hanging pictures or installing shelves.
To use a line level, it is first attached to a string or line by means of hooks or clips located at each end of the level.
The string is then pulled tight, and the line level is adjusted until the bubble is centered in the vial. This indicates that the string is level or plumb, depending on how the line level is being used.
Line levels are of very small size usually the size of the vial it has and since the level is hung using a string, the string may sag which results in low accuracy of the level.
Therefore a line level must not be used in those places where precision is important. However, they can be used for foundation work and for rough carpentry work or to install patios.
7. Engineer’s Precision Level
An Engineer’s precision level as the name tells is a high precision level used mostly by engineers and architects.
It is used to level the foundations or beds of precision machine tools in two axes and check their installation.
For machines such as lathe machines, CNC, or planers, leveling the base in a level pane is very important otherwise you will end up with major machine errors.
8. Inclinometer
An inclinometer also called a clinometer, a tilt indicator, or slope gauge is used to measure the angles of slope, elevation, or depression of an object with respect to gravity.
The measurement is given as an angular measurement or as a percentage with reference to a zero-level plane. In construction and engineering, inclinometers are often used to measure the slope of a foundation or the angle of the roof and of the retaining wall, or the pitch of a drainage system.
In outdoor activities, inclinometers are commonly used to measure the steepness of a hiking trail or the slope of a rock face for climbers. It is used to measure displacement in grounds, monitor excavations, monitor slope stability and is an essential tool for anyone who needs to accurately measure angles or slopes, whether in a professional or recreational setting.
9. Bull’s Eye Level

A bullseye level is a type of circular spirit level that is used to determine whether a surface is level in all directions.
It consists of a circular glass or plastic vial with a bubble inside, which is mounted in a circular metal or plastic frame.
To use a bullseye level, the user places the level on the surface to be checked and adjusts it until the bubble is centered in the vial. They are used to check the horizontal positions of devices, appliances, and instruments. You can find them in compasses and camera tripods so that they can be prevented from tipping in certain directions.
10. Water Level
A water level consists of two cylinders that are connected by a flexible plastic tube or hose and work on the principle that water always finds its own level.
It is used mostly by foundation contractors and also by carpenters, plumbers, or other people for matching elevations that are too distant for spirit levels to cover. The two cylinders are placed on top of surfaces and colored water is used for visibility. If the water inside the cylinders is at the same height then the surface is level otherwise, one surface is higher than the other.
11. Digital Level
A digital level is a modern and innovative tool that offers a high degree of accuracy and precision when measuring level and plumb. It is an advanced alternative to the traditional spirit level which uses electronic sensors to measure the angle of the tool and displays the results on a digital readout. These tools are equipped with high-tech sensors that can detect the level and plumb accurately designed to provide real-time and reliable readings.
They display measurements in various units, such as degrees, percent, inches/feet, or millimeters/meters, making it easy to switch between units based on the project’s requirements. Due to their advantages over traditional levels, they are widely used in places where high levels of accuracy and reliability are critical.
12. Laser Level
Laser levels work by emitting a laser beam that is projected onto a surface, creating a line that can be used as a guide for aligning objects.
The laser beam is typically emitted from the tool’s base or a separate stand, and it can be adjusted to project a horizontal, vertical, or cross-line beam, depending on the project requirements.
They offer a significant advantage due to their ability to project a line over a long distance, making them ideal for larger projects. This can save a lot of time and effort in tasks such as laying tiles or hanging shelves, where precision is crucial.
13. Cross-line Laser Level
A cross-line laser level is a specialized type of laser level that projects two intersecting laser lines, forming a cross, to create a precise reference point for leveling and alignment.
Some models of cross-line laser levels may feature multiple lines, allowing for even more precise alignment. Their ability to project intersecting laser lines makes them an essential tool for professional contractors, DIY enthusiasts, and anyone who needs to ensure a level surface.
How To Use A Spirit Level: 6 Easy Steps
A person who is seeing a spirit level for the first time will find it confusing to use it without proper guidance.
Understanding what the notches are for and what the bubble position indicates is important before you try to use the tool.
Hence, for your ease, we will be discussing the step-by-step procedure to use this tool.
Step 1: Select The Right Spirit Level
As discussed, we have many types of spirit levels with different shapes and sizes each intended for different purposes.
Before buying a spirit level, you should be clear about the length and width of the objects you will be measuring.
- Carpenter’s level will be great for general purpose use.
- A torpedo level would be handy to work in compact areas.
- A pocket level would be a better option if you want to carry the tool, with you in your pockets.
- A water level would be flexible for longer distances.
Step 2: Clean The Level And Your Object
A level is a sensitive tool. Dirt and debris present can disturb the accuracy of the tool.
- Make sure you keep your level clean and wipe it off with a clean cloth before you use it.
- Also check for accumulated dirt on the edges of the tool.
- Clean your working object too to get rid of dirt and debris.
Step 3: Check The Accuracy Of The Spirit Level
Sometimes, spirit levels do not work properly and give inaccurate results. Here you need to check the accuracy of the tool before you use it so that you can trust the results that your tool provides.
- Place the level on a flat plane and note the position of the bubble.
- Flip the level and place it in the exact same position again and mark the bubble for the second time.
- If at both times, the position of the bubble remains the same, then your level is accurate.
- If not, levels need to be replaced.
- Before replacing your level, make sure to test it in 2 to 3 different locations.
Step 4: Place Your Level In The Centre Of The Object.
Once you have cleaned your level and your work object and have also checked for the accuracy of the level, now your tool is ready to function.
Your horizontal object might be a framed picture, a desk, or even the floor and vertical objects could be a wall, door, cabinet, etc.
- Mark the center of the object as per the size of your work.
- Place the level at the Centre.
- For bigger objects, a small tool cannot give accurate results. So switch to a larger size level.
Step 5: Check For Vertical Lines On The Tube And Find The Bubble
After positioning the tool in your work, look for the double vertical lines on the tube and check the bubble position.
- If the bubble positions between two lines, then the surface is level.
- While measuring horizontal level, if the bubble shifts towards the left, then your left side is at a higher level compared to your right and vice versa.
- When you use a spirit level vertically, if the bubble shifts upwards, then the upward portion of the workpiece is on the higher side compared to the downward portion and vice versa.
Step 6: Double-Check By Moving The Level Away From The Center
You need to be sure that the result you are getting is the same at all positions at the work.
- In order to check this, move your spirit level away from the Centre to any other location and repeat step 5.
- Repeat this procedure at least two to three places.
- If you are getting the same result at all points, then you be sure of the level of your workpiece.
Conclusion
In this article, we have come across 13 different types of spirit levels each intended for a different purpose. Hence know your purpose first and then choose your level wisely.
Other than spirit levels, there are also laser levels and digital levels. A spirit level is best if you are going to use it on a regular basis for small and simple applications.
But if you are a professional requiring great accuracy, faster reading, and long-distance leveling, then it is a better option to opt for laser and digital levels. Now that you have understood how to use a level, follow the steps and get acquainted with your tool so that you can get the best results out of it.
FAQ: How To Use A Spirit Level
There are many categories of spirit levels and at most times, deciding the best level becomes difficult. Many questions arise in one’s mind.
These questions are the frequent doubts that arise in your mind. Knowing these answers will help you in many ways. So we have tried answering some of these frequently asked questions. Hope it helps you.
Q1. Is There Any Alternative For Spirit Levels?
Ans: For the vertical level, you can always use a plumb bob that hangs perfectly vertically due to gravity. For horizontal surface, just go for water level. You can also go with a water trench with a few inches of water in it.
Q2. Where Should The Bubble Be On a Level?
Ans: The bubble in every vial should be positioned exactly between the two-level indication vertical line marks. If the bubble is in the center, the surface you are checking is level. If the bubble is away from the center, the surface is rising on the side the bubble is higher.
Q3. Are digital Levels Better Than Spirit Levels?
Ans: A digital level is precise and it is easier to read and use. It lets you know exactly how level you are and which way you need to move in inches or millimeters. But it’s better to go for a spirit level if you are using it on a regular basis for small and simple applications.
